---
title: "What you need to know about the Internet of Things"
date: 2013-01-17T20:12:43+00:00
author: "poornerd"
tags: ["arduino"]
canonical: https://www.poornerd.com/2013/01/17/what-you-need-to-know-about-the-internet-of-things/
source: Raw Markdown twin of the HTML article; content is the original source.
---
The past few years I have spent some time using various API’s in the internet. Who hasn’t? Companies like http://mashery.com list thousands of API’s. The interconnection of these API’s is becoming a commodity – just look at http://ifttt.com (If this Then That .com ) or http://zapier.com .
Well the first eye opener came when Belkin brought out their WeMo line:
> WeMo is a family of simple and customizable products that allow you to control home electronics from anywhere.
[](https://www.poornerd.com/wp-content/uploads/2013/01/Screen-Shot-2013-01-17-at-20.17.35.png)One of many recipies to connect something in the internet to something in your home
> WeMo can interact with web-based social media and apps through a great service called IFTTT. When the front door opens, for example, you get a text or email. Visit IFTTT and check out recipes for some wild things you can do with WeMo. more >
Once I was more aware of this, I started seeing Blog posts like this: Using Siri to turn on the Christmas lights
If you start looking at the successful Kickstarter projects, you can find many that started out as “Internet Connected Electronics” like the type that have been showing up on Maker sites.
* Plant Link is a system that monitors the water needs of your lawn, garden, or house plants. It alerts you when they need to be watered and can even water them for you.
* Don’t salivate in vain at the delicious food your favorite chefs make. Nomiku cooks sous vide at a very precise temperature.
So for Christmas I got an **Arduino starter set**. This might seem daunting to some, but I did start of college studying Computer Engineering with basic Electrical Engineering classes.
With the Arduino I was SHOCKED at how easy it was to control hardware using an API just like I had been using the past years in the Web.
After the blinking LED example, I did the “play music” project with my startet kit. There was a simple “API” for playing a tone using the piezo speaker – for example:
`tone(buzzerPin, frequency(notes[i]), duration);`
Then I added an Actuator which converted a touch along a strip to a value between 0 and 1000, so I could play a scale by converting the value from the Actuator to one of the 7 “Tones” I had setup in an Array.
`
void loop()
{
int sensorValue;
// Read the voltage from the softpot (0-1023)
sensorValue = analogRead(0);
playNote(sensorValue);
}`
`
void playNote(int RGBposition) {
int indexVal;
if (RGBposition < 10 ) {
noTone(13);
} else {
indexVal = (RGBposition / 128) ;
char names[] = { 'c', 'd', 'e', 'f', 'g', 'a', 'b', 'C' };
char currentNote = names[indexVal];
tone(buzzerPin, frequency(currentNote));
}
}
`
When you take a step back an **consider** that this was a $25 controller board with a few wires, an Actuator for less than $1, and a piezo speaker for less than $1 which was powered by a USB port, you start to see that creating your own hardware attached to the internet is not that far off for a programmer.
**Consider** that a WiFI Shield (daughter board) ist around $30, or one with just ethernet or bluetooth a bit less...
**Consider** that a similar type of board - the Raspberry Pi is basically a full on x86 compatible PC with USB, WiFi, HDMI, and a Video/Audio Chip capable of HDTV - costs less than $50! It has similar ports and capabilities (API / Libraries) for "talking" to the hardware components you attach via the analog or digital ports, and you start to see that connecting your grill thermometer to the internet, and logging the temperature every minute to a Google spreadsheet doesn't seem that hard anymore.
**In 2013 Start following a blog which lists new Arduino add-ons like this one**: http://www.adafruit.com/blog/category/arduino/ and you will have a non-stop flow of new ideas of what could become part of the **"Internet of Things"**. Here are some examples which inspired me:
* The Arduino Esplora is a microcontroller board derived from the Arduino Leonardo. The Esplora differs from all preceding Arduino boards in that it provides a number of built-in, ready-to-use setof onboard sensors for interaction. The Esplora has onboard sound and light outputs, and several input sensors, including a joystick, a slider, a temperature sensor, an accelerometer, a microphone, and a light sensor. It also has the potential to expand its capabilities with two Tinkerkit input and output connectors, and a socket for a color TFT LCD screen.
* Robotic Arm Edge - With Robotic Arm Edge, command the gripper to open and close, wrist motion of 120 degrees, an extensive elbow range of 300 degrees, base rotation of 270 degrees, base motion of 180 degrees, vertical reach of 15 inches, horizontal reach of 12.6 inches, and lifting capacity of 100g.
* The Arduino Micro contains everything needed to support the microcontroller; simply connect it to a computer with a micro USB cable to get started. It has a form factor that enables it to be easily placed on a breadboard.
**Have fun, and share your ideas with me!**
 ](https://www.poornerd.com/wp-content/uploads/2013/01/Screen-Shot-2013-01-17-at-20.17.35.png)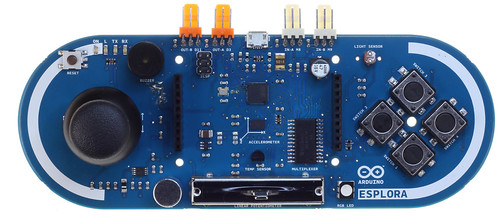
 * The Arduino Micro contains everything needed to support the microcontroller; simply connect it to a computer with a micro USB cable to get started. It has a form factor that enables it to be easily placed on a breadboard.
**Have fun, and share your ideas with me!**
* The Arduino Micro contains everything needed to support the microcontroller; simply connect it to a computer with a micro USB cable to get started. It has a form factor that enables it to be easily placed on a breadboard.
**Have fun, and share your ideas with me!**